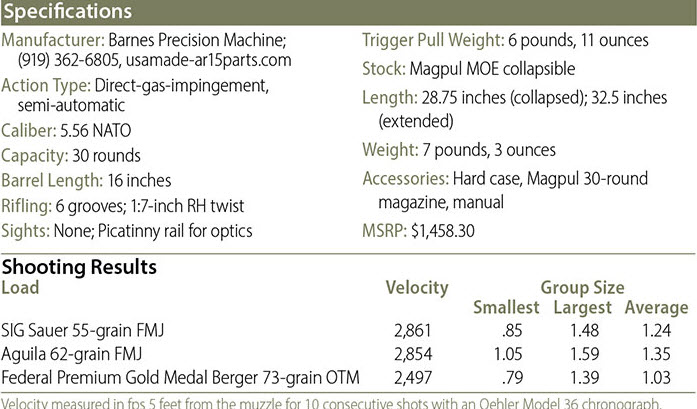
Shooting Illustrated had an assessment of the Barnes Precision Carbine. It seems a nice enough gun, although for the price you’re getting into BCM and Rock River Arms prices. I do like the looks of the hand guard, though. But what caught my eye was this chart.

I find this fascinating. I’m a wonk, I admit. But even if you don’t find it as interesting as I do, I’d request that you [a] see this first and foremost as a fishing expedition, not a tutorial (because that’s not my job), and [b] keep track of similar data and send to me as you run across it.
So here’s my specific interest. Technically, MOA is a measure of precision, not accuracy. Accuracy can be modified based on sight (or optic) adjustments. If you don’t understand the difference between accuracy and precision, without going through the mathematics of the Central Limit Theorem, you can see this article. So now you’ll understand why I am using the term precision for this information.
The precision is lower for the 62 grain bullets than for 55 grain or 73 grain. It would have been nice to see additional testing with Sierra MatchKing 77 grain OTM. The difference above is nontrivial.
We saw in a previous post (not because I knew this information, but because I know how to find this information) that when the Army tested the M855A1 round, they were using accurized 1:8 twist barrels, not 1:7 twist as per MilSpec. They got worse precision with the new ammunition with 1:7 twist barrels. The M856 tracer round is 63.7 grains, and the Army had to show that the barrel could stabilize the round in order to justify the new bullet.
A twist rate that is too high can over-stabilize bullets, leading to “keyholing.” We know that, and so it’s important not to overdo barrel twist. It is fairly standard knowledge that use of the 1:7 twist leads to slightly less precision for the 55 grain, and maybe for the 62 grain green tip. But it manages to stabilize the heavier rounds, including the rounds that are apparently in current use within SpecOps.
This stabilization is necessary because of changes made to the service rifle. The original M-16 had a much milder twist rate than does the shorter barrels in use today. The shorter barrels are a direct result of trouble getting into and out of vehicles for dismounted operations, going through buildings and around walls, and the general requirements of MOUT. In order to make the ammunition work for these shorter barrels, the engineers had to monkey around with twist.
Now I’m to my main point. I take interest in the fact that the precision is lower for the medium weight bullets. I’ll stipulate that the variables are many, including perhaps the most important one, barrel harmonics. I’d love to talk to some of the original engineers and test shooters for the newest Army round, but it’s likely that I’d never get the truth.
But what I can do is compile data of my own. I’m wondering if this behavior stands up with other twist rates? I’m also interested in whether barrel length plays a role. Why did the precision decrease with medium weight bullets, and recover at the lower and higher ends?
At any rate, if you run across any data for 1:9 twist, 1:8 twist, or any more data on 1:7 twist, using different bullet weights, I’d be very interested to learn the precision of the groups and plot for future reference.
Thanks in advance.


